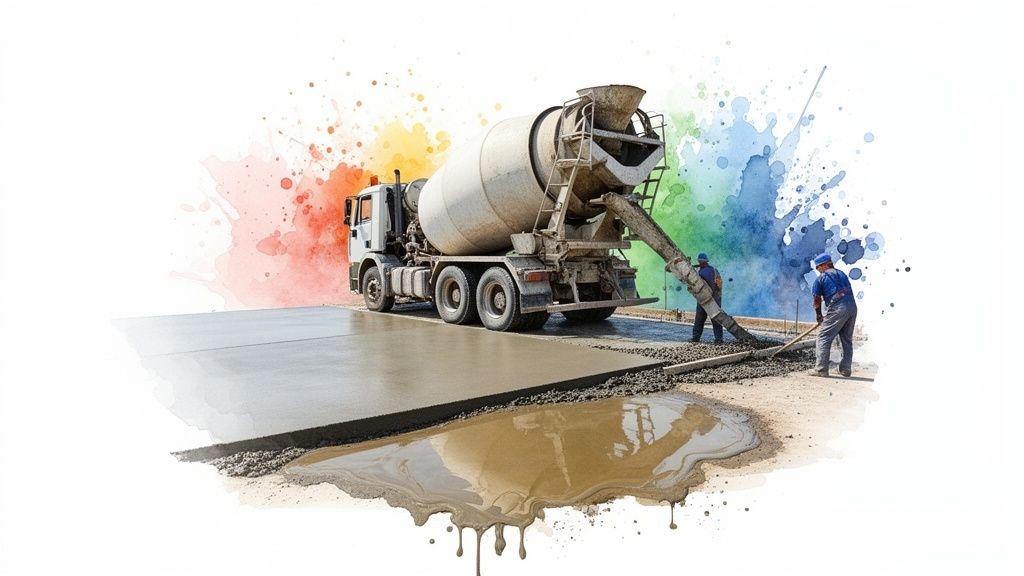
The slab looks good. The finishers are packing up. The pump is quiet. Then the driver asks the question that decides whether the site stays clean or turns into a compliance problem by the end of the shift.
Where is the truck washing out?
That moment gets overlooked on busy pours. Everyone is focused on the placement, the finish, the cure, the next delivery, the next inspection. But concrete wash water and slurry do not disappear just because the pour is complete. If the crew sends that material into a random corner of the lot, a storm drain edge, or a rough hole scraped into the dirt, the site can go from organized to exposed fast.
A proper concrete washout pit is not a paperwork item. It is field control. It protects soil, keeps caustic slurry out of drainage paths, gives drivers one obvious place to clean out, and shows the inspector that someone on the project is paying attention.
Your Concrete Pour Is Done Now What
The last truck on a slab pour is often when mistakes happen.
The crew is tired. The superintendent is already walking the next area. The driver needs to wash the chute, hopper, tools, or pump parts before material hardens. If there is no designated washout area, people improvise. Improvisation is where jobs get stained, drains get hit, and the SWPPP starts falling apart.
A clean site handles this before the first truck arrives. The washout location is marked. Drivers can find it without asking three people. The area is placed where splatter, tracking, and overflow will not create a second problem. That is what separates a controlled operation from a scramble.
What the washout decision really affects
A washout pit is doing more than catching gray water.
It is controlling a caustic slurry that can damage soil, reach stormwater systems, and trigger inspection issues. It also protects the crew. Nobody wants laborers or drivers stepping through fresh washout residue, dragging it onto pavement, or trying to chip out hardened concrete from the wrong place the next morning.
On a busy site, I treat washout planning the same way I treat crane access or concrete truck routing. It is not optional support work. It is part of the pour plan.
What goes wrong on real jobs
The common failures are predictable:
- No designated location: Drivers wash out wherever they stop.
- Poor placement: The pit is too far away, so crews bypass it.
- Wrong capacity: The unit fills before the pour is finished.
- No weather plan: Rain turns manageable slurry into an overflow risk.
- No service plan: Solids harden, space disappears, and the next pour starts with half a container.
A concrete washout pit should be easy to find, easy to use, and hard to misuse.
If it takes extra driving, backing, or guesswork, people stop treating it as the washout area and start treating it as one option among many. That is when trouble starts.
Understanding Concrete Washout and Its Environmental Impact
The pour is finished. Drivers start rinsing chutes, the pump crew washes tools, and gray slurry starts moving fast. If that material does not have a controlled place to go, it spreads into the exact areas the project is already trying to protect: soil, pavement, curb lines, and storm drains.
Concrete washout is a high-alkalinity waste stream created when trucks, chutes, pumps, wheelbarrows, and hand tools are cleaned after placement. It commonly reaches a pH of about 12 and may contain metals such as chromium and lead, according to the Diligent concrete washout report. That is why a washout pit is part of environmental control, not general cleanup.
On site, I explain it this way. Fresh washout behaves like a chemical spill mixed with sediment. It may look like muddy water, but it does not act like muddy water.
Why regulators treat washout seriously
Inspectors are looking at two things at once. They are checking whether the site is preventing discharge, and whether the contractor is managing a known source of caustic waste in a predictable way.
High-pH slurry can burn skin, injure eyes, and damage surrounding soil. If it reaches a stormwater inlet or drainage swale, the problem moves beyond housekeeping and into permit exposure. A stained curb is bad. A discharge path to the storm system is worse, and that is the kind of trail an inspector will follow.
Crews sometimes treat washout as the last five minutes of the pour. Regulators treat it as part of the stormwater and waste-handling plan. Project managers should do the same.
The environmental impact shows up on real jobs
Washout problems rarely stay in one spot. A little overflow turns into tracked residue on haul roads. Residue hardens at the edge of pavement. Rain picks up fines and carries them toward low points and inlet protection. Then the site is paying labor twice. Once to clean the mess, and again to explain why the control failed.
There is also a disposal side that gets missed in early planning. Washout is a recurring waste stream with volume, hauling requirements, and recycling potential. Treating it that way from day one makes the rest of the lifecycle easier, from container sizing and service intervals to final disposal records and cost control.
What unmanaged slurry affects
A bad washout setup creates problems in several parts of the job:
- Soil and restoration areas: Caustic discharge can damage surrounding ground and add rework before closeout.
- Stormwater controls: Silt fence and inlet protection are not designed to contain concrete slurry.
- Below-grade conditions: Leaks from torn liners or failing pits can migrate into surrounding soils.
- Crew safety: Splash exposure during washout and cleanup is a real hazard.
- Inspection readiness: Hardened residue near access roads, curbs, or drains signals weak site control.
What proper containment requires
A concrete washout pit has one job. It keeps wash water and solids contained until they can be removed, recycled, stabilized, or hauled off without escaping into the site.
That sounds simple, but field performance depends on the full chain holding together. The right unit has to be selected for the pour volume. It has to be placed where crews will use it. It has to be serviced before capacity disappears. It also has to fit the disposal plan and the project budget, because a cheap setup that overflows is never cheap in the end.
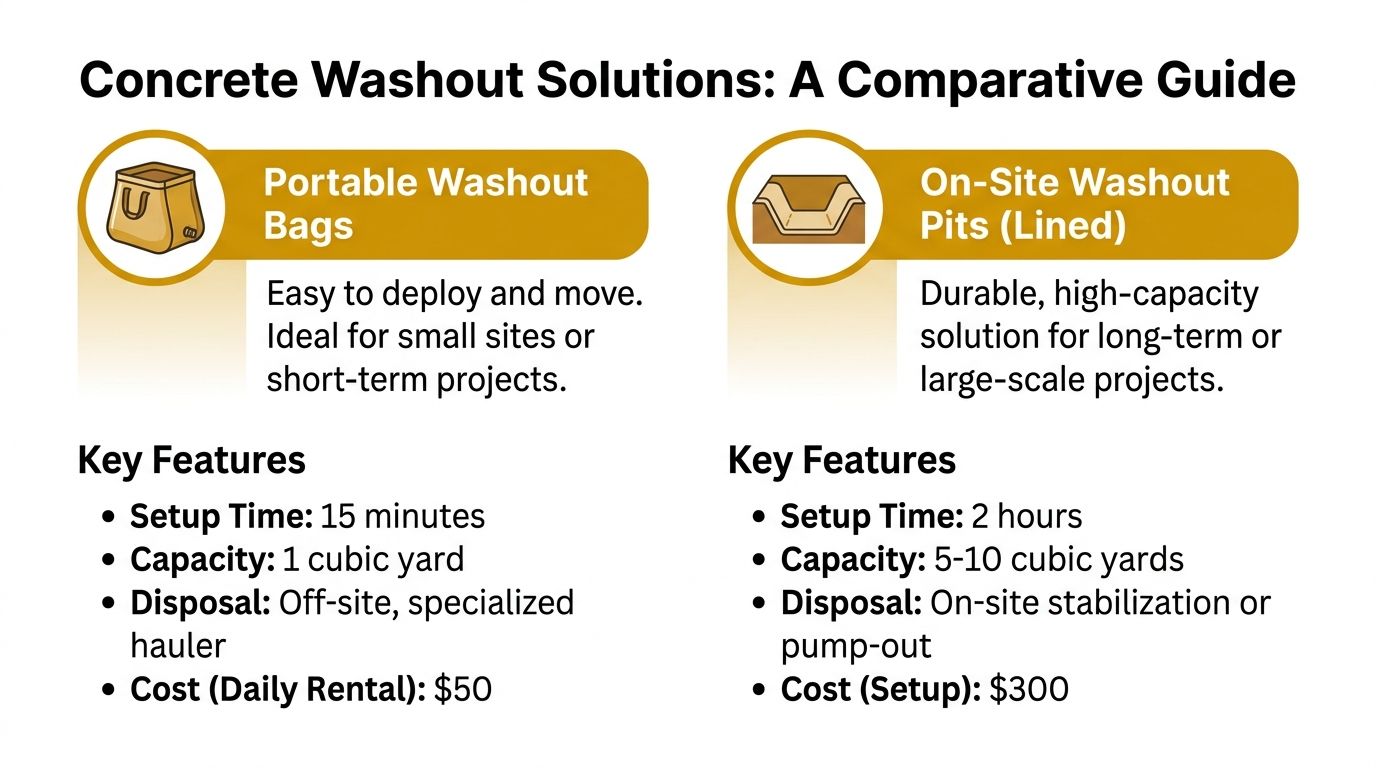
Comparing Different Types of Washout Systems
Most sites end up choosing between two broad approaches. A below-grade lined pit built on site, or an above-grade prefabricated container such as a steel pan or watertight vinyl unit.
Both can work. They do not carry the same field risk.
Below-grade lined pits
This is the old-school setup.
The crew excavates a shallow pit, shapes berms, and lines it with plastic. Some sites add hay bales, silt fence, or other perimeter control. It can be practical on larger sites with space, earthmoving already underway, and enough supervision to build it correctly.
The problem is not the concept. The problem is execution. Earthen pits fail when the liner tears, the berm slumps, the wrong location is selected, or the pit is undersized for the actual washout volume.
Where below-grade pits make sense
- Large open sites: There is room to set back from active traffic and drainage paths.
- Longer schedules: The site can justify building and monitoring a dedicated washout area.
- Stable access: Trucks can reach the pit without rutting, backing hazards, or soft ground.
Where they often disappoint
- Urban projects: Space is too tight and access conflicts with everything else.
- Wet conditions: Standing water and sidewall instability increase the chance of overflow or failure.
- Fast-paced jobs: Crews rarely maintain makeshift systems as carefully as they should.
Above-grade prefabricated containers
This is usually the more controlled option.
Steel pans, roll-off style units, and watertight vinyl systems arrive ready to place. They are visible, easier to label, easier to inspect, and easier to relocate when site logistics change. On active commercial work, that matters.
The operational advantage is simple. The container is the washout area. Nobody has to guess where the liner begins, how deep the pit is, or whether the berm is still intact after yesterday’s rain.
According to the MHFD concrete washout area guidance, prefabricated, above-grade washout containers reduce installation time by up to 70% compared to traditional excavated hay bale pits. The same guidance notes that watertight vinyl or steel units are often favored because they eliminate a common failure point for earthen pits, which is high-alkalinity leachate reaching soil and groundwater.
Side-by-side field comparison
| System type | Main strength | Main weakness | Best fit |
|---|---|---|---|
| Below-grade lined pit | Can be built on site with available equipment | Higher leak and overflow risk if built or maintained poorly | Large sites with space and oversight |
| Above-grade prefabricated container | Faster setup, clearer containment, easier inspection | Requires delivery, pickup, or service coordination | Commercial, urban, renovation, and short-duration work |
What works better in practice
On paper, a lined pit can look cheaper. In the field, cheap setup often means expensive maintenance.
A below-grade washout area asks the crew to be good at excavation, liner protection, berm building, drainage planning, access control, signage, and ongoing monitoring. Most projects are not staffed to babysit all of that.
A prefabricated container narrows the failure points. You still have to place it correctly and service it on time, but you remove a lot of the variables that cause problems.
A practical trade-off most managers miss
The best washout system is not the one with the lowest initial cost. It is the one people use correctly on a busy day.
If a truck driver can spot the container, pull up safely, wash out cleanly, and leave without crossing half the project, that system is doing its job. If the washout plan depends on every operator following a perfect path to an improvised lined pit in the back corner, the plan is weak no matter how little it cost to build.
How to Select the Right Concrete Washout Solution
Choosing a concrete washout pit starts with one question.
How much slurry, rinse water, and solids will this operation generate before the container is serviced or swapped?
Too many teams choose by habit. They order the same pan as the last job, or they dig the same pit size they always use. That is how overflows happen.

Start with capacity, not convenience
Sizing has to match the pour.
The Concrete Washout Container spec sheet states that a portable washout bin should have a minimum capacity of 5 cubic yards to safely handle the slurry from a 350-cubic-yard concrete pour. The same guidance notes that washout slurry requires about 1 to 2% of total pour volume in liquid retention to prevent overflow.
That gives you a planning baseline. It is not a suggestion. It is a warning against choosing a container by what is available in the yard rather than what the pour requires.
Then check job conditions
Capacity alone is not enough. A washout setup that looks fine on paper can still fail because of traffic flow, weather, or loading.
Use this screen before approving a washout plan:
- Pour size and sequence: One large placement is different from repeated smaller pours over several days.
- Equipment being washed: Truck chutes, pump hoppers, buckets, screeds, and hand tools all add volume and solids.
- Site access: Tight corners, narrow gates, and one-way haul roads affect what type of unit will get used.
- Ground conditions: Soft or uneven ground can turn a good location into a tipping or tracking problem.
- Service interval: If the unit will not be emptied quickly, leave room for accumulation.
Weight matters more than people think
Hardened concrete gets heavy fast.
The same spec guidance ties planning to slurry density and load. That is why supervisors should think beyond gallons. A container may hold the liquid volume but still create handling, transport, or structural issues once solids build up.
A quick field check
Ask three questions before approving the unit:
- Can it hold the expected liquid safely?
- Can it handle solids accumulation without distortion or unsafe pickup?
- Can the hauler or service provider remove it when the job is at its dirtiest, not just when it is clean?
If any answer is vague, the washout plan is incomplete.
The wrong-size washout pit usually does not fail at the start of the pour. It fails when everyone is busiest and least able to deal with it.
Weather changes the math
Rain is one of the easiest washout hazards to underestimate.
An uncovered container can take on water quickly. A site that looked properly sized during dry weather can lose its buffer after one storm. That is why rain planning belongs in pre-pour review, not after a near miss.
Things I look at before approving placement:
- Is the container exposed to direct rainfall?
- Is there a cover plan between pours and overnight?
- Does the selected unit leave enough freeboard for local conditions?
- Will runoff from adjacent pavement or grades enter the washout area?
A washout pit should not double as a rain gauge.
Match the system to the site
Different jobs need different answers.
A downtown renovation usually benefits from a compact, above-grade unit that can be placed cleanly and serviced without excavation. A broad civil site may have room for a lined pit if the team can maintain it. A project with frequent small placements may prioritize easy swap-out. A large monolithic pour may need a heavier-duty setup with a stricter service plan.
The best choice is the one that fits the pour, the weather, the traffic pattern, and the disposal plan all at once.
Best Practices for Washout Setup Use and Maintenance
A concrete washout pit fails most often because the field crew treats setup as the whole job.
Setup is only the opening move. The washout area has to stay usable from the first truck to final cleanup.
Place it where drivers will use it
A good location is visible, stable, and away from drainage features.
Industry guidance commonly calls for washout areas to be placed on level ground and away from storm drains or wetlands. On real jobs, I also want enough room for approach, washout, and exit without backing through congestion.
Practical placement rules that hold up on site:
- Keep access simple: Drivers should not need a spotter and a ten-point turn to use the washout.
- Protect nearby finishes: Do not put washout where splash can stain curb, masonry, or completed flatwork.
- Mark it clearly: A washout area nobody can identify is not a functioning control.
- Think about cleanup day: Place it where service trucks can reach it later.
Manage the washout during active operations
Crews need a basic process, not vague instructions.
When trucks arrive, point them to one designated washout location. During larger placements, assign someone to watch the area periodically. If pump parts are being rinsed out too, account for that extra material instead of letting it surprise you at the end.
A few habits prevent most headaches:
- Guide the chute into the containment area: Do not let washout splash over the edges.
- Watch fill levels: If solids are building toward the working limit, stop and service the unit.
- Separate trash from slurry: Cups, gloves, ties, and wood scraps complicate disposal.
- Do not allow side dumping: The edge of the container is not the target.
If the washout area starts looking like a general debris box, the crew has already lost control of it.
Maintenance is where compliance is won
Rain changes everything.
The Outpak washout best practices article notes that a primary cause of washout-related violations is overflow due to precipitation, and that an uncovered container can fill with rainwater and discharge caustic slurry. The same guidance points out that regulations in places like Oregon require washout facilities to be designed to prevent overflow.
That means maintenance has to include weather response.
Daily checks that matter
- Before rain: Cover the unit or confirm it has enough protected capacity.
- After rain: Inspect for overtopping, soft ground, and runoff entering the washout.
- After each pour day: Check for tears, cracks, warping, or berm damage.
- Before the next pour: Make sure there is still usable capacity, not just visible space.
Good maintenance is not complicated. It is repetitive. The site that keeps checking the washout area avoids the ugly surprise.
Managing Costs and Logistics Rental vs Purchase
The pour is finished, trucks are stacked up, and the washout plan either keeps the job moving or turns into another delay at the gate. That is how the rental-versus-purchase decision should be judged. Not by sticker price alone, but by how well the system holds up from mobilization to final haul-off.
The right answer depends on volume, schedule, and who is carrying the work after the pour. A general contractor with intermittent concrete scope usually gets better value from renting. A ready-mix producer, paving contractor, or self-performing concrete firm with steady demand may have a case for ownership because the unit stays in rotation and the company already has hauling, yard space, and service staff.

When renting makes sense
Rental works well for project-based operations because it keeps the washout plan matched to the job in front of you.
A small sidewalk replacement, a mid-rise slab package, and a bridge deck pour do not need the same container, service interval, or pickup timing. Renting lets the team scale up or down without owning units that sit in the yard between jobs collecting damage and taking up space.
Rental is usually the better fit if the job has:
- Uneven pour schedules: Capacity can be matched to short bursts of work instead of annual averages.
- Changing site access: Tight urban sites, interior pours, and spread-out civil work often need different footprints and delivery timing.
- Limited yard space: Storage, cleaning, and repairs stay with the provider instead of your operations team.
- Closeout pressure: One call for swap-out or pickup is simpler than hauling your own unit off a finished site.
There is another practical point. Rental shifts part of the compliance risk into a repeatable vendor process. That does not remove the contractor's responsibility, but it usually reduces the chance of showing up with the wrong equipment or losing time trying to service a unit your crew does not maintain often.
When buying makes sense
Purchase makes more sense when washout is part of weekly operations, not an occasional line item.
That usually means the company can keep the asset busy across multiple projects and already has the support system behind it. Ownership works best when dispatch, hauling, cleaning, inspections, and disposal are already built into the business. If those pieces are missing, the container is only the cheap part of an expensive process.
Use a simple field test. If your team would handle a washout unit the same way it handles job boxes, barricades, or roll-off coordination across several active sites, ownership may pencil out. If every project needs a different answer and no one wants one more asset to track, rental is usually the cleaner choice.
| Situation | Better fit |
|---|---|
| Frequent concrete operations across many jobs | Purchase may pencil out |
| Occasional or uneven concrete scope | Rental is usually simpler |
| Limited storage and service capacity | Rental |
| Dedicated internal hauling and maintenance | Purchase can be practical |
The expensive part is delay
Crews often focus on the container rate and miss the true cost. Lost time is what hurts.
Analysts at Modern Pumping Today examined fast concrete washout systems and found that for a ready-mix plant running 20 mixer trucks and 40 washouts daily, traditional washout handling can consume 20 minutes per washout. That adds up to 800 minutes, or more than 13 hours of daily downtime across the fleet. The same analysis estimated up to $195,000 per year in truck and driver-related savings, with total annual savings that can exceed $500,000 when reclaimed materials and additional delivery capacity are included.
A project site is not a ready-mix plant, but the lesson carries over. If trucks wait to wash out, access roads clog. If the unit is undersized, service calls become urgent instead of planned. If your owned equipment is sitting on another job, the site improvises, and that is where violations start.
What to count before deciding
Run the decision across the full life of the job, not just the first invoice.
Include these cost and logistics items in the comparison:
- Delivery, swap-out, and pickup timing
- Who cleans and inspects the unit
- Storage between projects
- Hauling capacity for full units
- Disposal coordination and paperwork
- Risk of ordering the wrong size
- Driver and crew time lost to poor placement or slow service
A low rental rate can still be expensive if the provider cannot service the unit on your pour schedule. A purchased unit can still be a bad investment if it sits idle for months or needs special hauling every time you move it.
The best choice is the one that supports the full washout lifecycle on your projects, selection, delivery, use, service, removal, and disposal, without forcing the field team to improvise under schedule pressure.
The Ultimate Contractor Compliance Checklist
Use this as a field audit, not a desk exercise.
A concrete washout pit only protects the job when the plan survives contact with trucks, weather, and schedule pressure.
Pre-pour planning
Confirm the location on the site plan
The washout area should be identified before trucks roll in, not picked in the moment.Match capacity to the pour
Review the expected concrete volume, the equipment being washed, and whether the unit has enough room for both liquid and solids.Check setbacks and drainage exposure
Keep the area away from storm drains, wetlands, and low spots where runoff can enter or escape.Verify access
Make sure drivers can approach, wash out, and leave without crossing sensitive areas or causing congestion.Set a weather plan
If rain is possible, confirm cover, freeboard, and overflow prevention before the placement starts.
During operations
Mark the area clearly
Drivers and pump crews should know exactly where washout belongs.Watch actual use
Early in the pour, verify that wash water is landing inside the containment and not splashing over edges.Keep trash out
General debris mixed into slurry complicates service and disposal.Monitor fill level
Do not wait until the container is nearly full to decide what happens next.Protect adjacent work
Track-out, splash, and hardened residue around the washout area are signs the process is drifting.
The best compliance check is simple. Walk the washout area during production, not after everyone leaves.
Post-pour and disposal
Inspect the unit or pit condition
Look for tears, leaks, berm damage, deformation, or overtopping.Cover or secure it if weather is coming
Overnight rain can turn a manageable setup into a reportable problem.Schedule service before capacity disappears
Hardened solids reduce useful volume quickly.Document the condition
A quick photo and note for the project file can help if questions come up later.Close the loop on final disposal
Make sure solids and wastewater are handled through an approved process, not left to become the next phase’s problem.
If a superintendent can answer every item above with a confident yes, the washout side of the project is usually in good shape.
Frequently Asked Questions About Concrete Washout
Can we just dig a hole and call it a washout pit
Not safely, and often not compliantly.
An unlined hole in the ground leaves too much to chance. The slurry is caustic, it can migrate, and makeshift pits often fail on sizing, overflow control, and containment. If the site uses a below-grade pit, it needs to be properly lined, placed, and maintained.
What usually triggers washout violations
Overflow, poor placement, and lack of containment.
Rain is a major one. If a container is uncovered or undersized, it can discharge slurry after a storm. Another common problem is a washout area that exists on paper but is too awkward for drivers to use, so crews wash out somewhere else.
Can hardened concrete from washout be recycled
Yes, in many cases.
Handled properly, washout solids can be separated and routed for reuse or recycling. That is one reason good containment matters. Once the material is mixed with trash or allowed to escape into soil, useful recovery becomes much harder.
What about the water
Do not assume it can be dumped because it looks like muddy water.
Washout water is part of the waste stream. It needs to stay contained and be handled through the site’s approved process. The right answer depends on the system in use, local requirements, and the service method selected for the job.
What is the biggest mistake new project managers make
They treat washout as a small end-of-day task.
It is better to treat it like fuel planning for an excavator or traffic control for a pour. If the support system is not ready before work starts, the field improvises. Improvised washout is what creates stains, delays, inspection issues, and cleanup costs.
If your team needs a straightforward way to keep concrete slurry contained, organized, and serviceable, Reborn Rentals offers ready-to-deploy washout containment rentals for construction and renovation projects. Their catalog includes durable washout pans with clear specifications, upfront pricing, and delivery coordination that helps crews set up a compliant washout area without overcomplicating the job.