You're standing at the edge of the pour, the truck's on its way, the crew's ready, and somebody on site is still asking whether the forms will take another half-yard. That's the moment when how to estimate concrete volume stops being a spreadsheet problem and turns into a jobsite decision. Get it right and the pour moves cleanly. Get it wrong and you're looking at idle labor, scrambling, and a crew trying to finish with too little material.
Why Nailing Your Concrete Estimate Matters
The nightmare scenario is simple. The truck pulls away, the last section of form is still low, and everybody on site can see the problem at the same time. The finisher starts stretching the mix too thin, the crew is waiting on a second load, and the schedule starts slipping before lunch.
That short pour doesn't just waste time. It can force a cold joint, create a rushed finish, and damage your standing with the client and the plant. In concrete work, the margin between a clean day and a messy one is often just a small estimating error.
What bad orders really cost on site
Under-ordering causes more than a little inconvenience. It breaks the rhythm of the pour, leaves crews standing around, and makes the rest of the day harder than it should be. Over-ordering isn't harmless either, because excess concrete becomes a disposal and cleanup problem instead of finished work.
A solid estimate protects three things at once. It protects labor, because the crew keeps moving. It protects schedule, because the delivery plan stays intact. It protects reputation, because the job looks controlled instead of improvised.
Practical rule: don't treat the estimate as a loose guess. Treat it as the first logistical decision that shapes the rest of the pour.
The best foremen don't think about volume in isolation. They think about truck timing, site access, finishing speed, and what happens after the last wheelbarrow leaves the slab. That's why a good estimate starts with geometry but ends with a jobsite plan.
The Core Formulas for Common Concrete Shapes
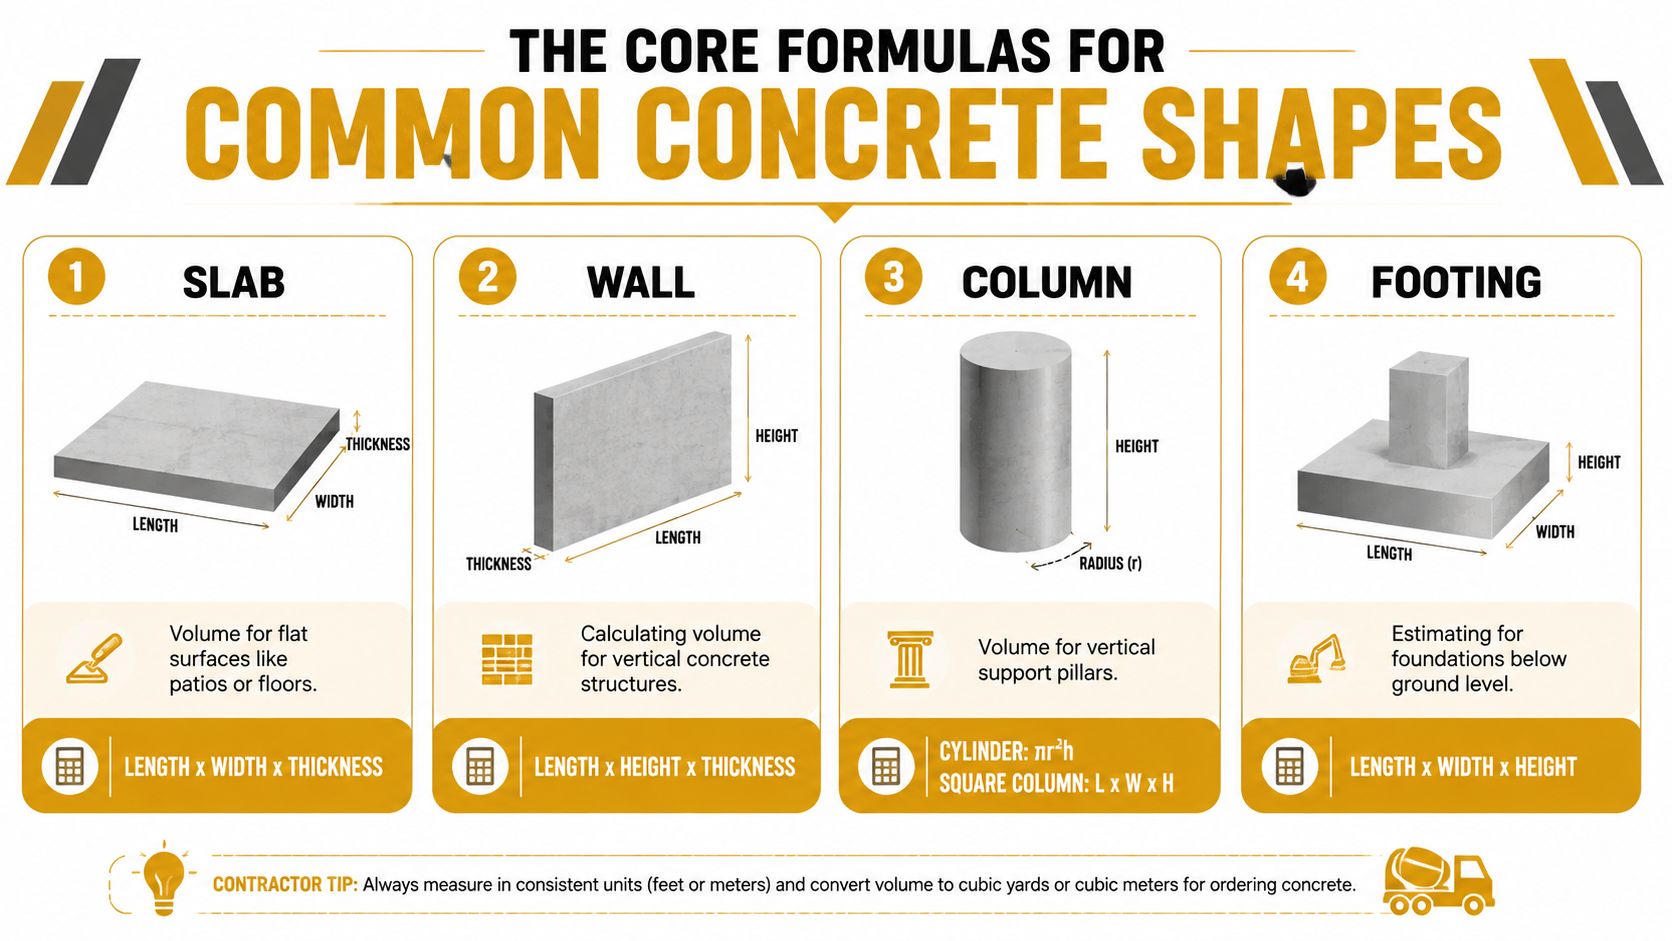
A good pour can still go sideways if the math is sloppy. On site, the fix usually comes too late, after the truck is already loaded and the crew is waiting. The safer approach is to keep the formula simple, keep every measurement in one unit system, and check the numbers before the order goes out.
For flat work, the standard formula is length × width × thickness. For wall pours, use length × height × thickness. For a footing, the same rectangular logic works if the shape is box-like.
Slabs, footings, and walls
A rectangular slab is the easiest place to start. Measure the length and width in feet, then convert the thickness to feet before multiplying. If the slab is 10 feet by 10 feet at 6 inches thick, the accepted benchmark is 50 cubic feet, which is about 1.85 cubic yards before waste, and roughly 2.03 cubic yards after a 10% allowance is added, using the standard conversion of 1 cubic yard = 27 cubic feet from construction guidance and the example benchmark in the provided material.
That same discipline applies to footings and walls. A footing is still a volume problem once you break it into a rectangle. The difference usually comes from thickness changes, so the measurement has to match the actual form, not the rough drawing in your head.
Walls follow the same idea, but height becomes the driver. A straight wall pour can look simple from the ground and still be wrong if the base thickens, the top tapers, or the form bows. Measure the actual dimensions, then calculate the volume from those numbers instead of guessing from appearance.
Columns and round forms
Columns are where a lot of newer estimators drift off course. A round column should not be treated like a square box just because the math feels easier. The correct method for cylindrical shapes is π × radius² × height, which fits round forms and keeps the order from coming up short.
For columns that are square or rectangular, use base area × height. For round pads or piers, use the cylinder formula. The point is to match the formula to the shape, not to force the shape into whatever calculation is quickest.
Unit discipline that keeps orders honest
Keep everything in feet before you multiply. Convert inches to feet first, not after the fact. If you mix inches and feet in the same line, the final number can look believable while still being wrong.
Site habit that saves money: measure the pour in sections, then add the sections together before you add waste. That keeps the estimate cleaner than padding every section individually.
The other habit that helps is checking the estimate against how the pour will run. A clean number on paper still has to fit truck size, access, crew speed, and washout planning once the material hits the site.
Calculating Volume for Complex Shapes Like Stairs

Stairs look awkward because they're not one clean block. The fastest way to estimate them is to stop thinking about the whole flight as a single shape and split it into the parts the form produces. That means separating the waist from the steps.
The waist is the sloped rectangular base. The steps add the stepped geometry on top of it. When you calculate both separately and then add them, the job becomes manageable.
Break the stair into two volumes
Start with the waist slab. Measure its length, width, and thickness exactly as you would a small slab. Then calculate the step mass separately as a series of triangular pieces or as the stepped portion of the form, depending on the layout.
That split matters because stairs are often misjudged when they're treated like a plain prism. The visible shape tempts people to estimate by eye, but the hidden mass under the treads and rise lines is where the actual volume sits.
A practical stair workflow
- Measure the overall run and width. Get the full footprint of the flight.
- Measure the waist thickness. That's the structural base under the steps.
- Work out the step section separately. Count the steps and use the actual rise and run geometry.
- Add the two results together. Then convert and order from the total.
That sequence keeps the math honest. It also fits the way a stair form is built, which makes it easier to check against the layout on site.
If you're estimating stairs for a job with tight access, accuracy matters even more. There's less room to hide an error, and a short delivery becomes obvious fast. A careful split calculation is the safest route when the pour isn't a simple rectangle.
Converting to Cubic Yards and Applying Waste Factors
Once the geometric volume is right, convert it into the unit the plant uses. The working rule is simple, divide cubic feet by 27 to get cubic yards, since 1 cubic yard equals 27 cubic feet. That is the handoff from site math to the truck order, and it keeps everyone speaking the same language.
Waste comes after the conversion. It is not a guess, it is a cushion for field conditions. A standard allowance of about 10% is commonly used for ordinary work, while 15% to 20% is used for rough ground or more complicated shapes.
How to think about waste without overdoing it
Waste covers the parts the geometry does not catch. It absorbs small spills, slight form irregularities, and changes in the subgrade. It also gives you room for a pour that does not stay perfectly clean, which happens often enough that it should be planned for, not ignored.
Do not add waste to each subsection as you go. Total the shaped sections first, then apply the waste factor once to the full figure. That keeps the order from getting padded more than it should, a mistake construction guidance warns against. calcfort.com concrete guidance
Common mistakes that distort the order
- Rounding too early: small rounding errors build up fast, especially on larger pours.
- Mixing inches and feet: one wrong unit can throw the whole order off.
- Padding each section separately: that can push the order beyond the actual need.
- Forgetting that waste is site-specific: rough terrain calls for a more cautious buffer than a clean slab.
A job that looks simple on paper can still eat concrete in the field. The waste factor should reflect the site, not a habit. If the forms are clean and the grade is controlled, the buffer can stay modest. If the pour is irregular, awkward, or split across several shapes, a larger allowance is the safer call.
From Estimate to Order Job Site Logistics and Washout Planning

The estimate only matters if the site can receive the pour. That means the order has to be communicated clearly, the crew has to be ready, and the access route has to work for the truck. A clean calculation won't save a job with bad coordination.
The plant needs more than a number. It needs the right mix details, the delivery timing, and enough information to match the pour to the crew's pace. If the order is vague, the risk shifts from the calculator to the site, and that's where delays get expensive.
What the order has to cover
A ready-mix order should be specific enough that nobody has to improvise on delivery day. The volume matters, but so do the site conditions that affect placement. The foreman should know who's receiving the truck, where the truck can stage, and what happens if the pour runs long.
The logistics don't stop when the last bucket is placed. Concrete washout has to be handled as part of the plan, not as an afterthought. A designated washout area keeps slurry from being dumped where it doesn't belong, and it helps the crew stay organized during cleanup.
Why washout belongs in the estimate conversation
A pour with no washout plan turns into a cleanup problem fast. Tools, chutes, hoppers, and wheelbarrows all need a place to be rinsed, and that rinse water has to go somewhere controlled. If the site doesn't have a designated containment setup, the whole crew ends up improvising around a mess.
Responsible washout practices protect the site, the client, and the crew. They also keep the job looking professional upon completion, a quality that matters more than people admit. A concrete operation that can place, finish, and clean up without scattering slurry everywhere is easier to trust on the next job.
Concrete estimating doesn't end at the order. It ends when the delivery is placed, the site stays controlled, and the cleanup is contained.
That's the trade-off most guides leave out. A great estimate is wasted if the delivery can't be received cleanly. A practical foreman plans the pour and the washout together, because both are part of the same workflow.
Estimating Concrete Is a Skill Not Just a Formula
A solid concrete estimate starts with the math, but it doesn't end there. On site, the form layout, truck access, and cleanup setup decide whether that estimate holds up in practice. Crews that do this well treat volume as the starting point and the field conditions as the check on their work.
Keep the units clean, match the formula to the shape, break difficult pours into manageable sections, and add waste at the end. Then confirm the truck has a place to stage and the crew has a controlled washout plan before the first yard is placed. That combination turns a decent takeoff into a pour that stays organized from start to finish.
The best foremen I've worked around read the numbers and the site at the same time. They know a clean order still fails if the delivery can't be received, and a good pour still creates problems if the slurry has nowhere to go. Closing that loop is the defining skill.